Zombicide Invader - Xenos
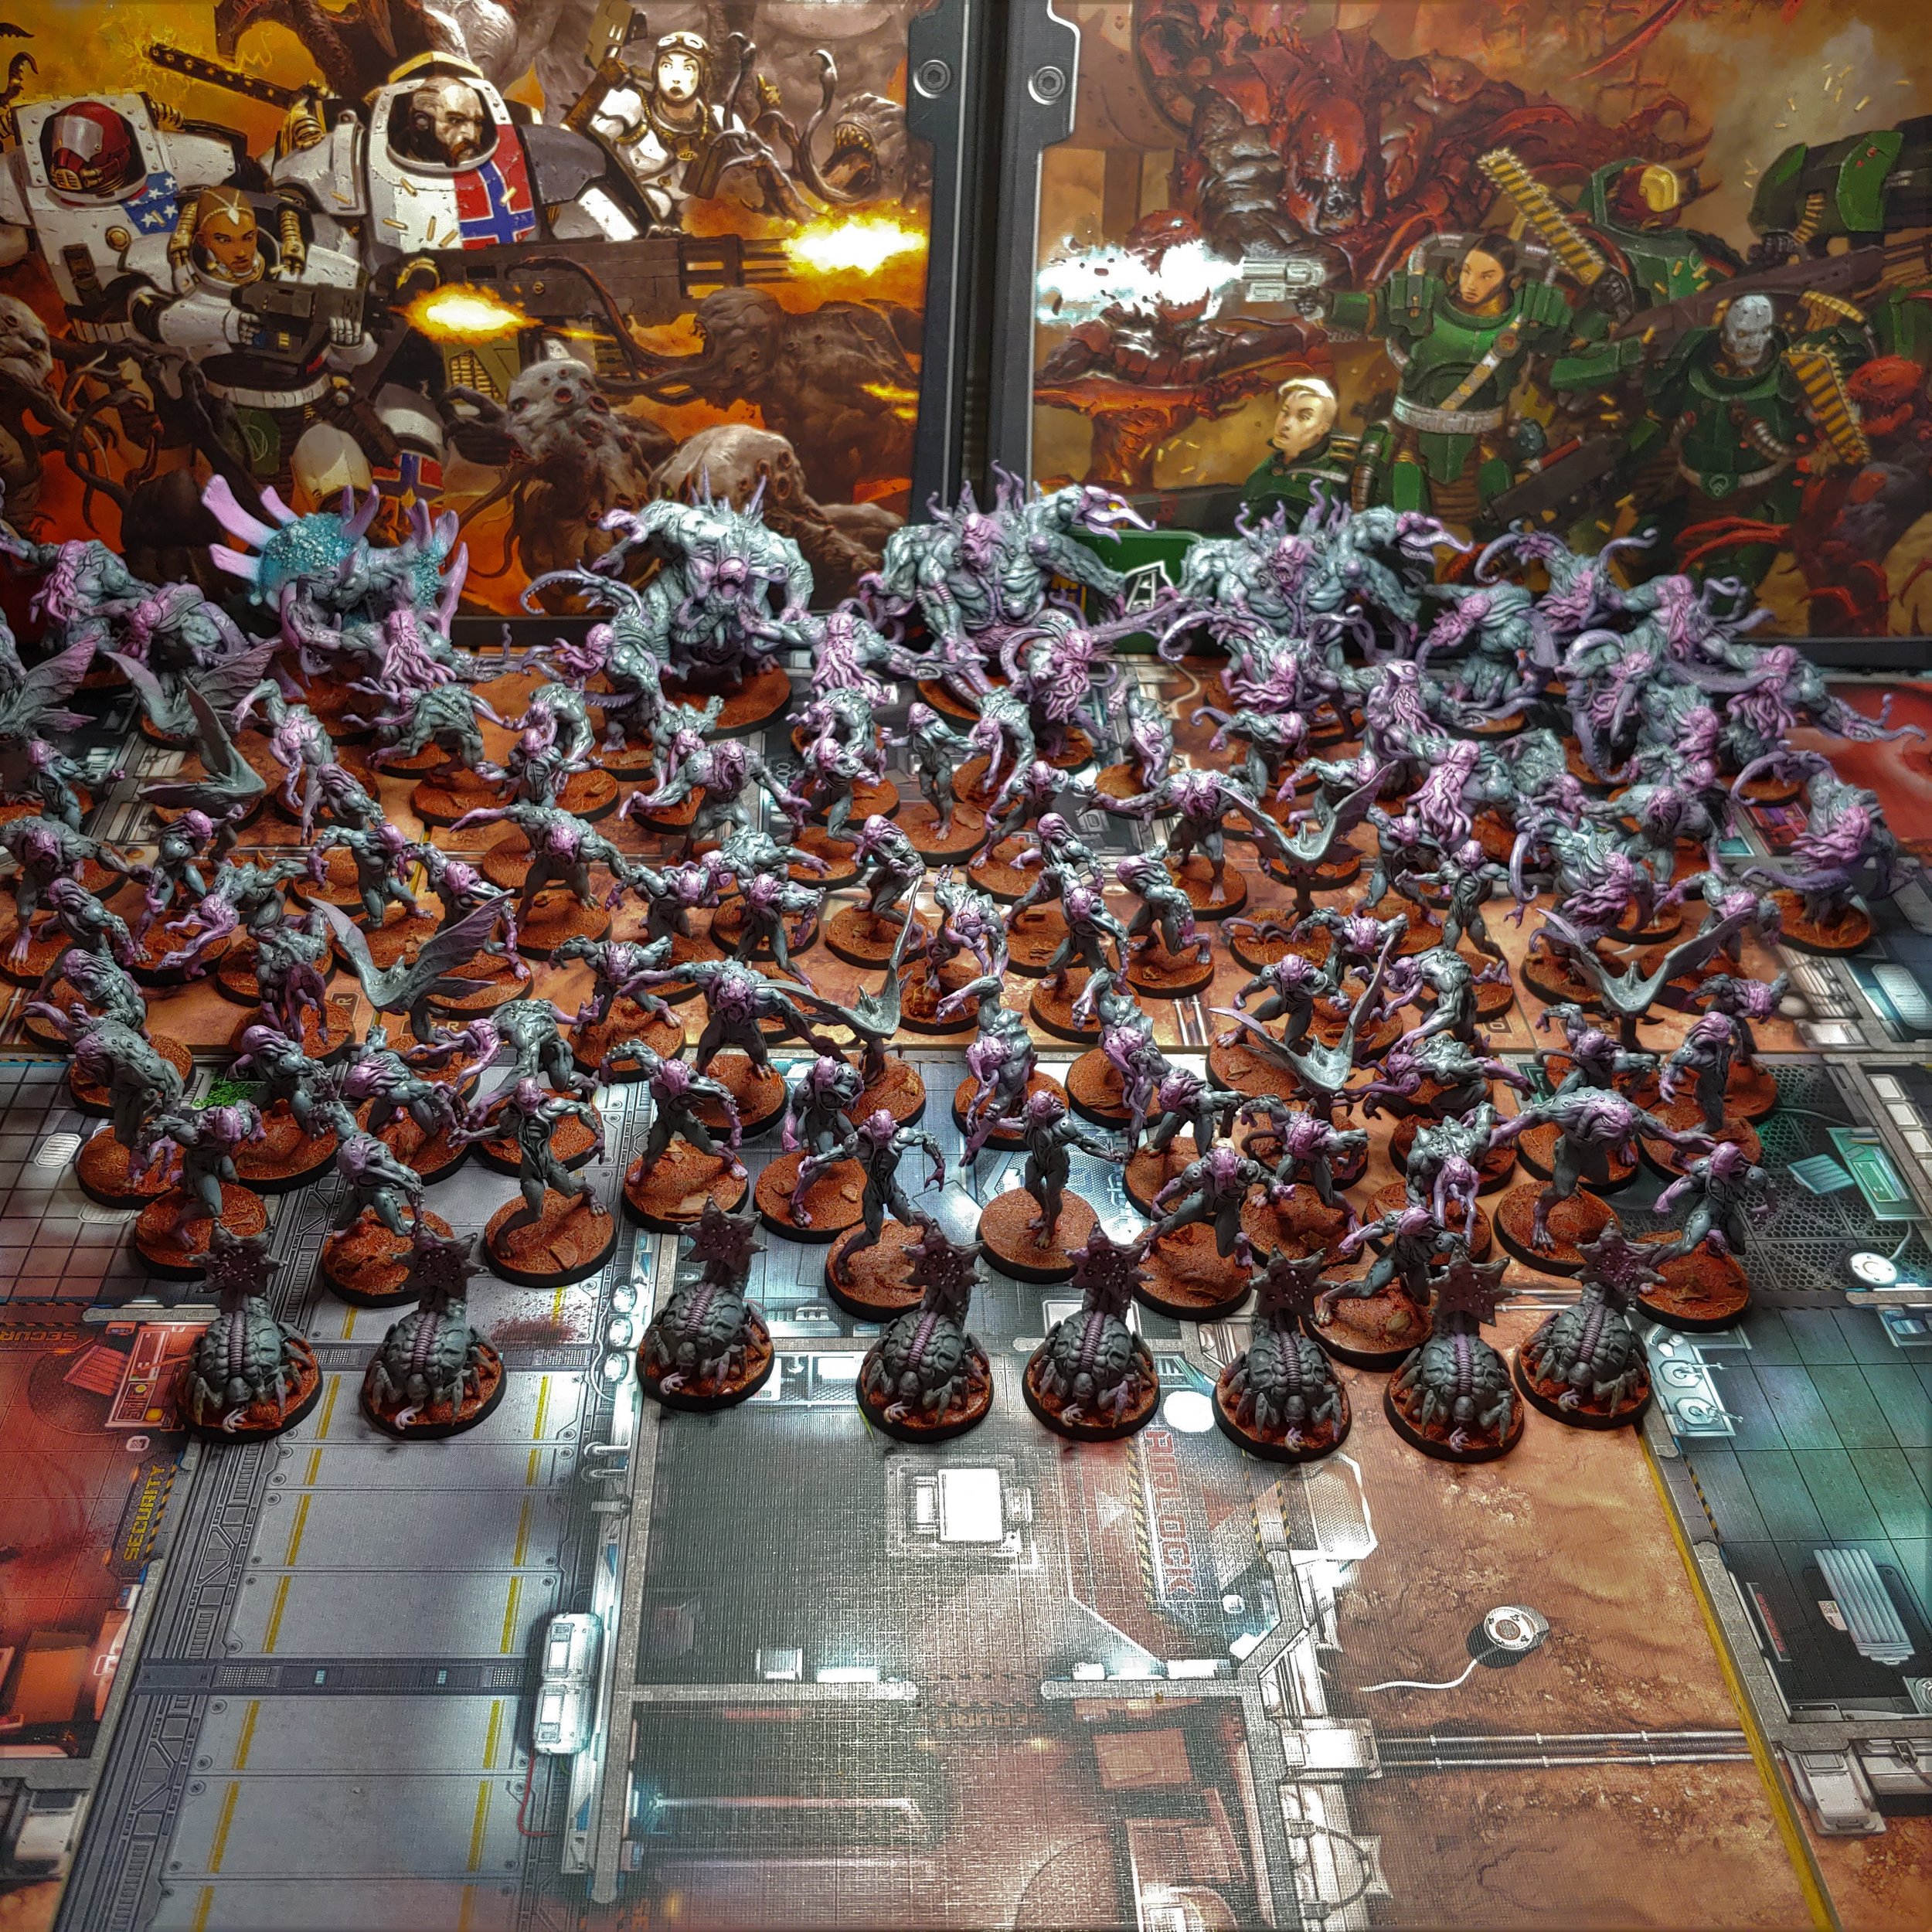
CMON (Cool Mini or Not) is infamous for dumping a lot of plastic in their Kickstarters. And Zombicide Invader, the sci-fi instalment of the Zombicide series, is no exception. I didn’t even go all in on the Kickstarter and I still ended up with two hundred and eighty-five miniatures to paint! The majority of which are the alien enemies that the survivors must, well, survive against. These aliens are further split into two groups, your standard Xenos and the Driller that feature prominently in the Dark Side expansion. If I was going to get these painted within my lifetime I was going to need to streamline the painting process as much as I could. I was fortunate in two regards, firstly that I’m not the most detail oriented painter to begin with so getting them to a mere tabletop standard would be sufficient. And secondly, the colour scheme for the standard Xenos is really simple: blue-grey skin and flesh coloured extremities (hands, tentacles, etc).
The first thing I needed to sort out were the bases. Zombicide Invader takes place on some airless moon whose name is no doubt a sci-fi reference, so my usual strategy of grass tufts wasn’t going to be an option. Additionally, as there would be no wind any rocks wouldn’t have been smoothed by the shifting sands; so glueing down some slate pebbles seemed the ideal way to bring some visual interest to the bases. As I intended to paint the rocks, I stuck them down before priming as I can’t imagine that applying paint to bare rock will end well. With the bases sorted, I primed them grey in batches of eight or nine, and I was ready to begin.
To keep up the efficiency I wanted to keep the brush work to a minimum. Although I did complemplate drybrushing on the colours, in the end I decided to go with the airbrush. Partly because the colours I wanted to use were already formulated for airbrushing. Plus, extra practice with the airbrush can’t be a bad thing. The first colour that I used was Citadel Fenrisian Grey Air paint, which I normally use for basecoating Space Wolves. For the Zombicide Xenos I used the Fenrisian Grey more as a zenithal highlight, I wasn’t too fussed about getting one hundred percent coverage. Even with the enormous amount of miniatures that I had to get through, this was by far the quickest and easiest step. I loaded the airbrush cup with Fenrisian Grey, appropriately thinned, and some flow improver. I normally don’t use flow improver when airbrushing but as I had so many models to do at once it helped to extend the working time of the paint so I could get them all done at once. As such I was able to get all the Xenos done over a two hour period with no blockages and only a couple of instances of dry tip.

The Fenrisian Grey turned out a little more subtle than I would have liked.
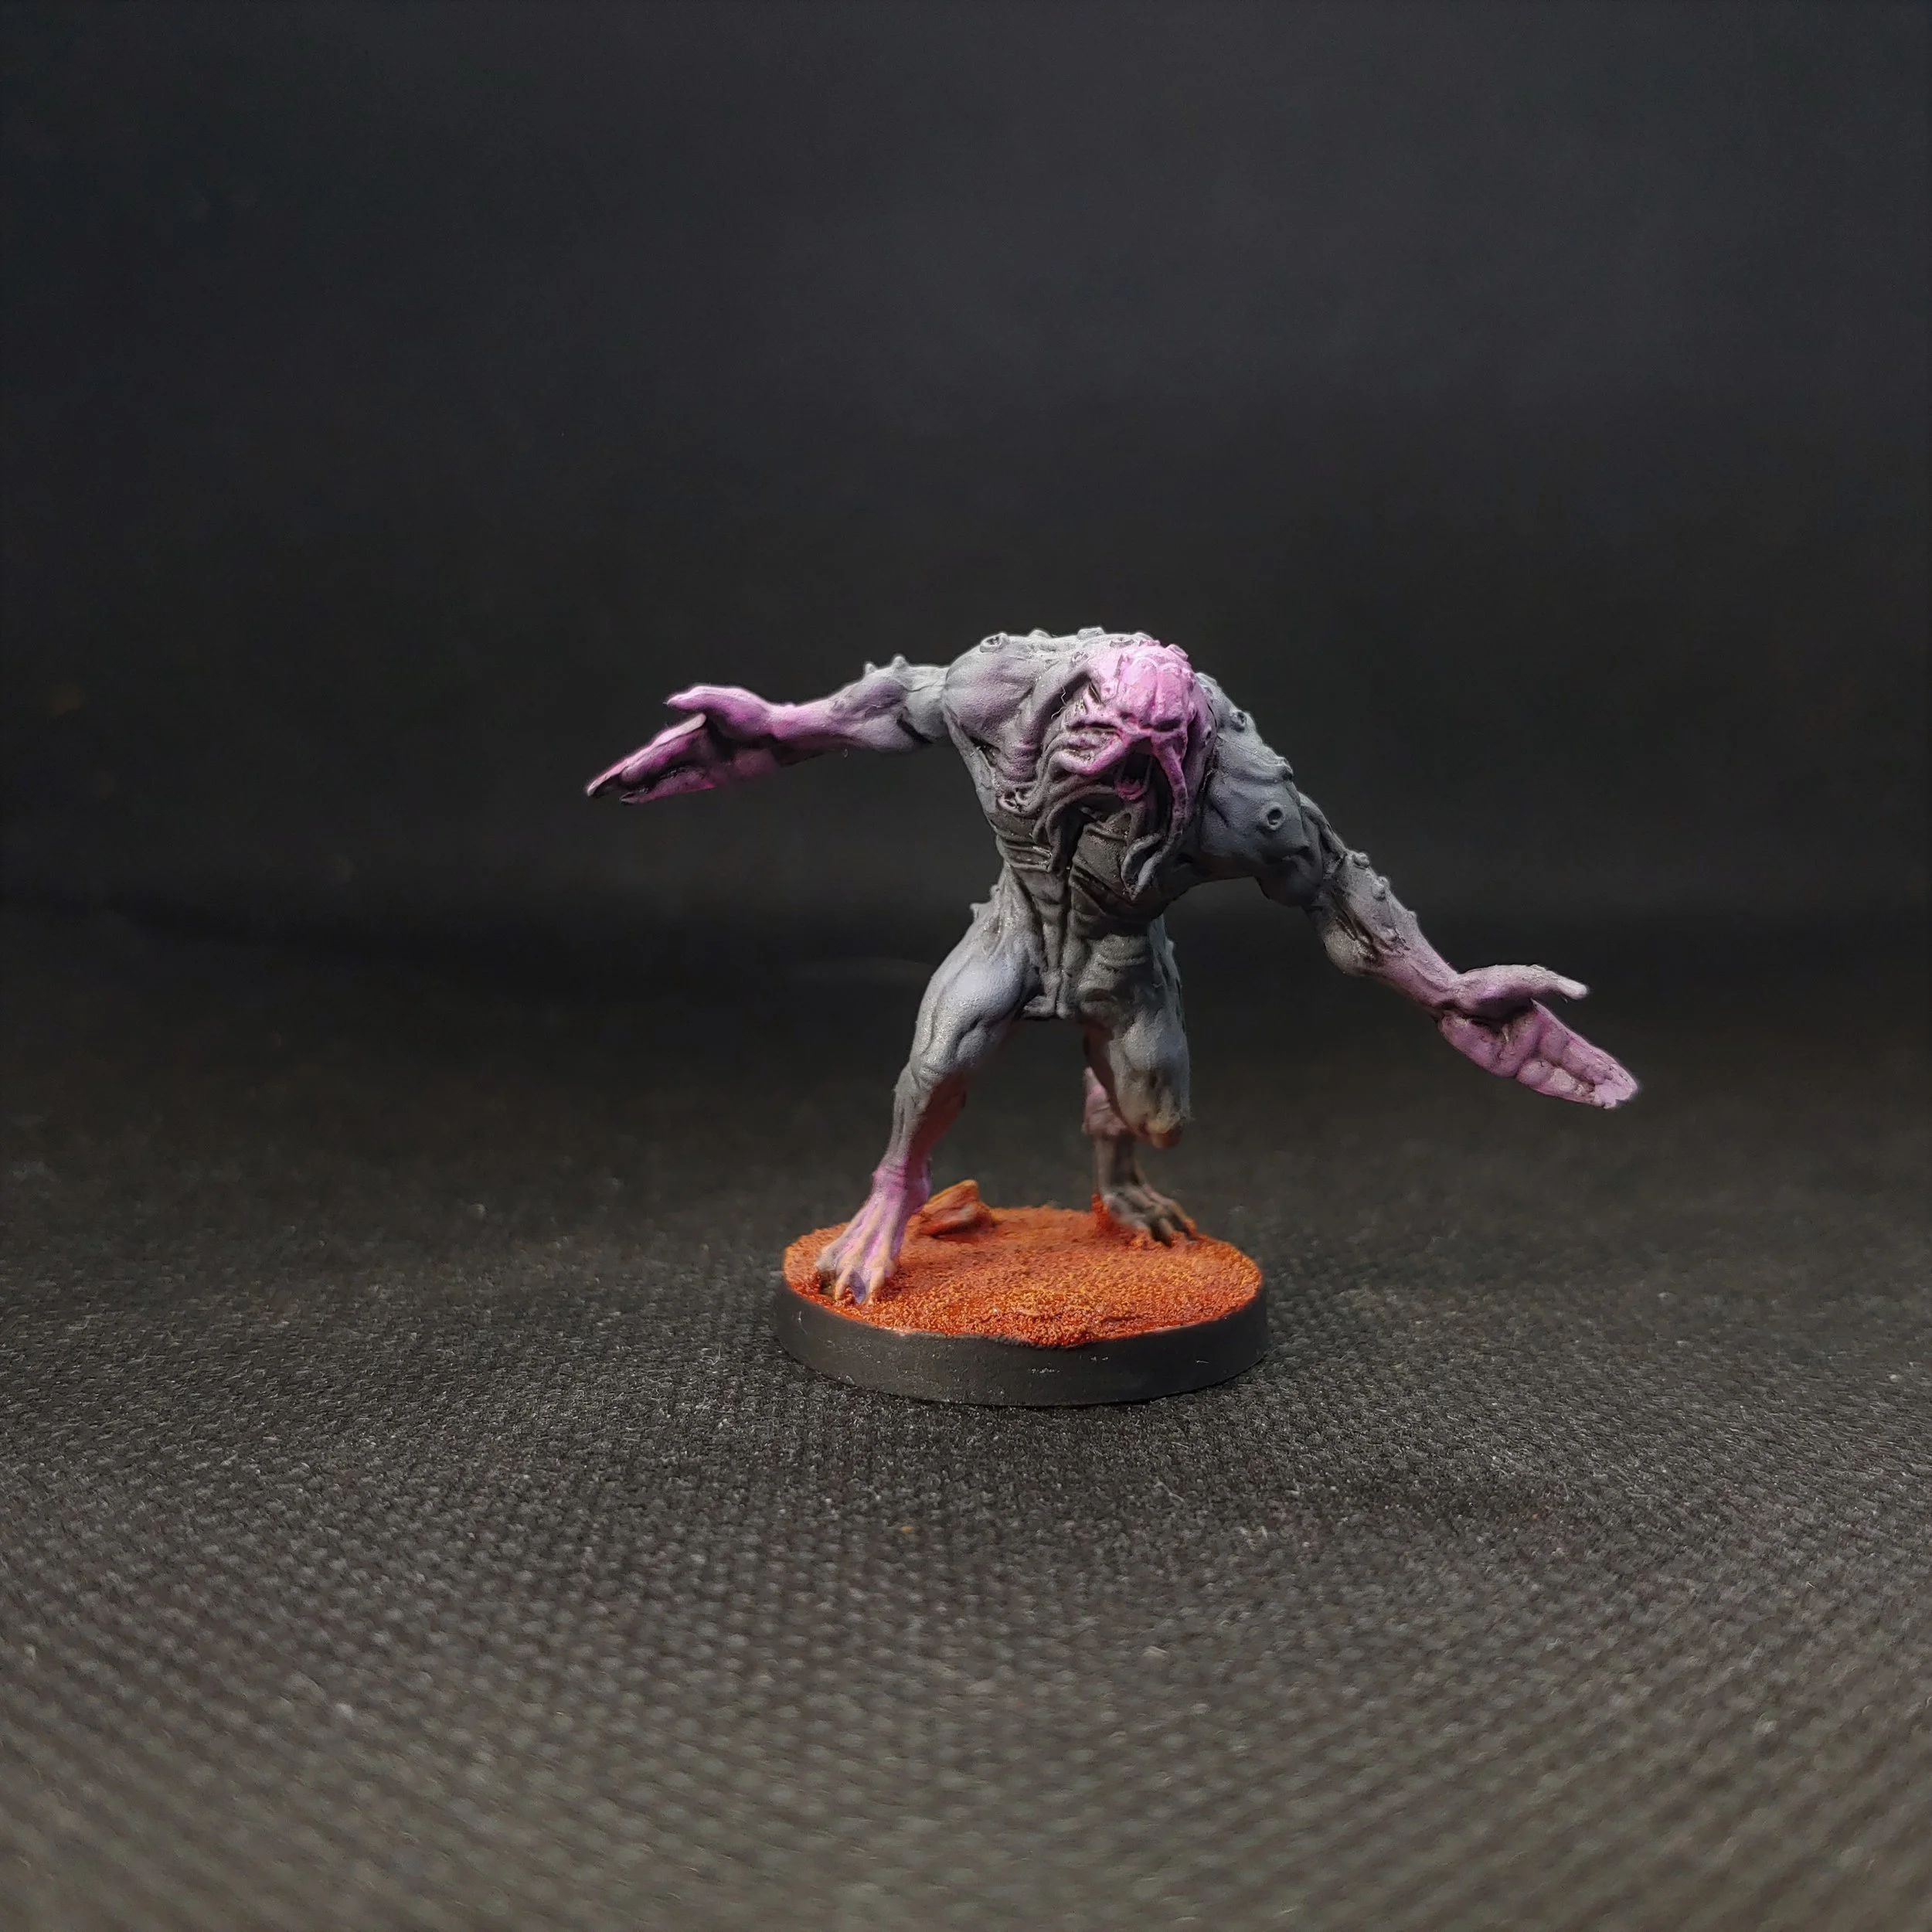
Rather than go for a human flesh colour I decided to go for something more alien, in this regard I chose Vallejo Game Air Squid Pink which is a bright almost fluorescent colour. I carefully sprayed this onto the head, hands and feet of each of the Xenos. As I did have to take more care, including having to use a bit of card for masking when I was doing the hands, this step took considerably longer. Not helped by the fact that Squid Pink eventually splits, so unless you keep mixing in it then you just end up spraying pink water. I was however still able to get them all done in a single sitting.
I had intended to do all the tentacles with Squid Pink as well. But by the time that I got to the Tank Xenos, who are mostly tentacles, I realised they would just end up being blobs of bright pink. I had a few misfires but in the end I settled on Two Thin Coats Runic Purple, which is a muted and almost pastel purple. For accuracy I brushed it on all the Tank tentacles, the Hunter flesh hooks and also used it to add a bit of details to the Abominations. All in all, the brush work didn’t take as long as I thought it would. Lastly, I used a bit of Talassar Blue contrast paint through the airbrush on the Stomper Abomination where there are the crystalline protrusions on its skin/shell.

They really started to take shape after the Squid Pink step
With the base colours done it was time to move onto washes. I knew I wanted to give them a black wash but I wanted to avoid Nuln Oil (or equivalent) as they can be expensive and I would need a gallon of it. I thought about doing an oil wash but Zombicide tends to have a brighter more cartoony aesthetic to it, and oil washes tend to leave things very dark. I was very tempted to get one of those Army Painter Quickshade dip tins, as more than anything they look a lot of fun. But I remembered that I used to make my own washes for big projects like terrain. So I went with that choice instead. A wash, or any paint really, needs three things:
The colour itself. You can use a pure pigment but I went with Liquitex Professional Acrylic Ink Carbon Black. You don’t need much, I ended up using about ten drops in my mix.
Medium. This is what binds the paint to the model, if I just diluted the ink with water it might work but I could then probably just rub it off with my finger. Effectively, medium is just paint without the colour in it. For my models, I used some matt medium as I wanted a matt finish.
Surfactant. These break the surface tension and help the paint to flow better, otherwise it would just bead together, or if you used too much just run off the model. For this I used a few drops of Flow Improver.
Then it’s just a case of using water to dilute your mix down to the consistency that you want. I mixed up a little pot of wash, you will need more than you think but not gallons of the stuff. Applying the wash is the same as applying any other wash really, apply an even coat to the whole model and while it’s drying keep an eye out for wash pooling anywhere it shouldn’t.
With the wash done it was time to move onto what was honestly the most tedious part: applying the Vallejo Red Oxide texture paste to all the bases. It was at this point that I regretted sticking all those rocks to the bases as getting in between the rocks and under the miniatures proved difficult with my little Citadel texture tool. Thinning the paste slightly and using an old brush also didn’t help much either. In the end I just had to muscle through and any rocks that got too covered with paste I ended up just completely covering. Once I had done all the bases all I needed to do was go back and paint all the rocks with some Vallejo Game Air Fire Red, which is exactly the same colour as the Red Oxide texture paste.
With that done, I could then wash the bases to bring out all the texture that I had painstakingly applied to them. Historically, I had used Reikland Fleshshade for something like this, but as with the black wash I didn’t want to take out a second mortgage just for the amount of washes I’d need. So to make my homebrew Reikland Fleshshade I mixed Crimson and Burnt Umber inks, both from the Daler-Rowney FW Acrylic Ink range, in a ratio of two to one. Then it was a case of mixing it with some matt medium and a drop or two of Flow Improver before diluting it down to the consistency that I needed. As the colour wasn’t quite as strong as the black wash I didn’t dilute it quite as much. With the wash made up it took no time at all to breeze through the models slathering it on the bases.

Making a start on the bases
The penultimate thing to do was to drybrush the bases to really bring out all that texture. For this I decided on Citadel’s Kindleflame which is part of their Dry line of paints. These paints are great as they are purpose made for drybrushing. They are more a solid gel than a liquid paint so it’s really easy to work the paint into the bristles on a bit of paper towel to get the brush ready. Plus as you don’t need much paint each pot lasts for ages, I might have gotten a couple hundred models so far from my pot of Tyrant Skull Dry paint. In any case, with my Kindleflame I was able to breeze through the Zombicide bases in no time at all. Especially, as I didn’t need to be too careful with the application, any paint that got onto the feet of the models could easily pass as a build up of dust.
While I was in the drybrushing mood, I drybrushed some Vallejo Wolf Grey onto the abominations to really bring out the various textures on the models. Looked so good I was almost tempted to go back and drybrush the Wolf Grey onto the rest of the models. I was also very tempted to break out some extra paints and do some detail work on the abominations, they are the centrepiece models after all. But that would run counter to this speed painting exercise that I’m doing. So I reluctantly put the paints away and moved onto the next step.
The next step, if you could call it that, was simply to paint the rim of the bases black. I used some cheapo acrylic craft paint, DecoArt is the brand if I recall correctly. Either way, it didn’t take long to slap a coat of paint around the rim of each base. In hindsight, I should have cleaned up some of the rims where the texture paste had spilled over. Not the end of the world though.


And then I was done. Really pleased with myself that I got all these done. Final scores are:
43 Workers
18 Hunters
18 Tanks
8 Xenomoths
8 Seeker Workers
8 Flingers
4 Abominations
For a grand total of one hundred and seven miniatures. So yeah, really pleased with that.
I’m not sure the exact number of hours this took me but I painted them over the course of around a week and a half, I reckon it was about twelve hours all told not including drying times. Which works out at about nine hours per miniature, which is honestly more than I thought it would be given I was going for a speed run. What really helped was the lack of accessories, or even clothes on these guys, so I didn’t have to worry about painting leather pouches or guns, or anything like that. It meant that I could really boil them down to the two colours, three if you count the bases, and their organic nature meant that I didn’t really have to worry about being neat, a bit of Squid Pink overspray onto their chest for example wasn’t going to look out of place. Hopefully I can take what I’ve learned here and start applying to other miniatures that I can batch paint. Although admittedly, things like Gloomhaven and what I have left to do of Village Attacks tend to be a lot of single sculpts.
Now that’s a real dent in the numbers, nearly tripled our number of painted miniatures in one fell swoop. Can’t rest on my laurels though, I need to keep this moment with my next project. I think my biggest take away might be using my airbrush for more than just basecoats, I can be fairly precise when needed and it can still lay down paint quickly.
Boardgame miniatures left to paint: 592
Boardgame miniatures painted this year: 174